Wednesday 31 July 2024

Guards Steampunk 8

 Greetings

I had completed the bow section for the officer's sash.

I now had to make two tail pieces.

The single piece I had cut for this was already covered in black wool.

I decided to add the decoration first and then cut it in half.

The additional four metres of gold lace I had ordered had now arrived, so I added the three lines.


You will note that I opted not to close the outer lines at the ends (as on the antique original section of the sash). I decided  it was easier to finish the ends with pieces of the same wider lace (piped with red wool cut to shorten the tunic sleeves)I had used in the centre of the bow section. This would also make it easier to add bullion fringing.

Next, I added the Russia braid.


Then I cut and piped the two end pieces of wider gold lace and  sewed a doubled section of bullion fringing.

I then cut the single tail length in two and added the bullion fringing and piped lace to the ends.


I had only then to attach the tails to the back of the bow.

None of the examples I had found showed how the bow was attached to the adjustable leather strap of the sash.

My first idea was for the strap to pass through the centre loop closer of the bow, but this would mean setting the tails too far apart.

I therefore opted to cut out the centre back of the bow closer loop and  sew its two cut ends to the back of the bow. This required using strong thread.

I then used the same thread to sew the tops of the two tails into loops  and then double sewed the top curve of the loop to the back of the bow, I needed both a good thimble and a pair of pliers to do this.

The finished piece looks like this.


and the back looks like this.


I got fully dressed in the full rig and had Teddy take some photos, which I will post later.

Until next time

Adieu


Saturday 27 July 2024

Judge Declan 11

 Greetings

More tribulations for our young Albion City Judge...


Until next time

Adieu

Wednesday 24 July 2024

Guards Steampunk 7

 Greetings

I had finished sewing the lines of gold lace and Russia braid on to the bow section.

Now I tidied up the lace and braid ends and sewed the section into a bow loop.


Next, I had to make a piece to close the centre of the bow. As the examples I had found used a narrower piece for this, I decided to use a different width of gold lace for the decoration.

I also decided to make use of the pieces of red wool I had left from shortening the sleeves of the tunic.

I did not have to decorate the concealed rear part of the closer loop, so I cut a shorter piece of the gold lace and attached the red wool as piping.


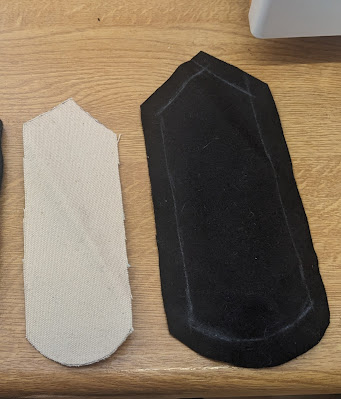
I then cut some canvas to length and some black wool to cover it,


hand sewed the wool to the canvas


before hand sewing the piped gold lace to the piece.


I then sewed piece into a loop and slid it on to complete the bow section.


I will post more on this project later.

Until next time

Adieu


Saturday 20 July 2024

Judge Declan 10

 Greetings

Judge Declan's encounter with Judge Leather is heating up...


Until next time

Adieu

Wednesday 17 July 2024

Guards Steampunk 6

 Greetings

Having finished the cuffs and the epaulettes, I turned my attention to the officer's waist sash.

I had previously acquired an antique waist sash, which was, sadly, missing the cover piece  which normally hides the adjustable leather strap.

I , therefore decided to make my own cover piece and (after some research) determined that this should be shaped like a bow.

I adjusted the sash to fit and measured the gap.

Luckily I had some belt strapping that I previously bought that was the same width as the sash.

I cut this into a piece for the bow and a piece to make two tails.


I then flat covered both pieces in black wool closing with herring bone stitch.


I had several different widths of the same gold lace pattern as the original , but not the right one.

I managed to find it on line and ordered two metres- which I was sure would be enough for the project.

I added three line of gold lace to the bow section...


and found this alone was only just shy of two metres. I hastily order four more metres.

The original sash showed a thin piping of red wool on the edges of the gold lace, but I opted to edge it with red Russia braid, which I initially tried to machine sew.

Unfortunately, this proved very difficult to do accurately and the Russia braid did not take well to unpicking. Thus I ended up hand sewing it on, which required patience- and a thimble.


I will post more anon.

Until next time


Adieu

Saturday 13 July 2024

Judge Declan 9

 Greetings

The judge is down to his undies...


-But he has more trials to come...

Until next time

Adieu

Wednesday 10 July 2024

Guards Steampunk 5

 Greetings

I have continued to work on the epaulettes of the steampunked Irish Guards uniform.

I completed sewing on the gold lace, but left the outer edge of the curve unsewn.


Next, I used my brass spike to make holes for the rank badges, which are held on with split pins.

You will note that I opted for the rank of Captain.


Then I carefully doubled over lengths of bullion fringing and hand sewed the two layers together, before hand sewing them onto the epaulettes.

I then tried them out on the tunic to see how they sat.


Next , I sewed down the last of the gold lace and sewed a flexible gold braid over the curve.


Finally, I cut pieces of black felt and , removing the rank badges,glued them to the underside of the epaulettes.


I whip stitched round the edges then pierced the holes for the rank badges with my spike and replaced them.


The epaulettes are now complete.

I still have some work to do on the uniform and will post more later.

Until next time

Adieu

Saturday 6 July 2024

Judge Declan 8

 Greetings

Here is another version of this computer art


Until next time

Adieu


Wednesday 3 July 2024

Guards Steampunk 4

 Greetings

Having finished the cuffs, I now moved on to the epaulettes.

I decided that I would not reproduce the wing epaulettes of the original uniform.

I measured the epaulettes of my Scots Guards tunic and the epaulettes I bought for my Napoleonic Line Officer tunic.

I decided that I did not want the epaulettes to be as rigid as the Napoleonic ones, so opted to only stiffen them with one layer of canvas.


Once I had sewn the wool to the canvas, I measured the position and length of the button hole, cut it and button-hole stitched the raw edges.


I then hand sewed the  wool tape round the button hole.


Next  I hand sewed the edging of gold lace. This required me to hand pleat the lace round the end curve of the epaulette.


I will post more later.

Until next time

Adieu